Esta información en Español:
The Heroku platform is one of the easiest and quickest ways of getting your apps up and running in the Cloud. Owned by Salesforce, it provides you with all the tools you need to move your Java, Python, Ruby, Node.js, Clojure, or Scala applications to the Cloud, forgetting about all the server side maintenance; all this will be handled by Heroku.
 The Heroku online documentation is very helpful to get you started, as there are a few articles to help you set up your environment. The first one you should read to check the prerequisites is the Getting Started with Java on Heroku post; but basically, what you need to bear in mind is the following:
 - Basic Java knowledge, an installed version of the JVM and Maven
- Your application must run on the OpenJDK version 6, or 7
- A Heroku user account: signup is free and instant
If you have your own Spring MVC Web application, then you are probably looking for the quickest way to get it up in the Cloud. The Heroku articles on Spring MVC apps give you instructions to clone sample applications from their repositories, but it is not easy to find details on how to deploy your own custom Spring MVC app. That is why I am writing this post, to gather all the steps required to deploy your WAR files to Heroku, including the changes you need to perform in terms of database connection, the plugins in you pom.xml file or URL nomenclature.
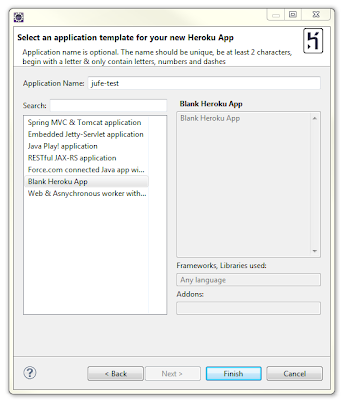 Create your empty Heroku app
Perform the following steps in Eclipse to create a blank Heroku application:
New > Project > Heroku > Create Heroku App from Template.
Fill in the Application Name field with the name you want for your application (it has to be a unique identifier within Heroku), select the Blank Heroku App option and click on Finish in order to create an empty Heroku application.
This action will automatically generate your new project in your Package Explorer and in your local folder structure.
The newly created app will also be available in your Heroku Dev Center, which will look like shown next:
This is just an empty application that has been created in the Heroku space, without any resources available; you now need to create your database and load your code.
Create your Postgresql Database in Heroku
 |
| Application's resources (empty) |
Heroku sample apps provide Postgresql databases, so this sample application will also implement a Postgresql database to hold the data to be used. You can create your Postgresql instance from your account in the Heroku Dev Center. By selecting the Resources icon, you will be shown your app's resources.
By clicking on the Get Add-ons link you will be redirected to the Heroku Addons page, where you can select the Heroku Postgre addon and install it on your app.
Connecting to your Postgresql database
Your new Postgresql database addon has been added to you app, and it is an empty database so you need to create your data structure.
Connecting from a database client: The connection information for your Postgresql database can be obtained from the Heroku Postgre site. Clicking on your database from the Heroku Dev Center takes you to the Heroku Postgre site, where you can login for free and you will be shown the list of all your Heroku databases, and for each of them you can view the connection details.
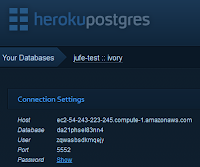
When attempting to connect remotely to your Postgresql database, you need to use two additional parameters for the connection:
- ssl=true
- sslfactory=org.postgresql.ssl.NonValidatingFactory
Connecting your local app to the Heroku database: It is a good practice to test connectivity from your Spring MVC application. You will have to configure your dataSource as shown next:
Do not forget about the connectionProperties parameter, without which your connection will be refused.
Connecting your Heroku app to the Heroku database: The configuration in this case should be taken from the environment variable created in your Heroku app for the database configuration. You need to create two beans to specify your dataSource, as shown next:
The environment variable that Heroku creates by default is DATABASE_URL, which will be automatically added to the application's context when you deploy the WAR file; you can view your environment variables from your Heroku plugin for Eclipse. If you go to the "My Heroku Applications" view within Eclipse and you right-click on your app, you can select the App Info option, and then in the Environment Variables tab you will find the information:
At this point you have performed all the required set up to take your app to the Cloud using Heroku; however, it may be that the DATABASE_URL and JAVA_OPTS environment variables are not in your list yet, as they are generated on deployment.
You now need to perform some changes to your code before uploading it to the Cloud.
Changes to your App's code
You can copy your code from your local workspace to the folder where your new application has been created.
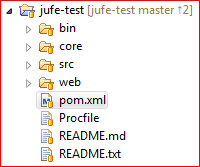
When you deploy your app to the Cloud, Heroku will look for a specific file, so you need to create this file to tell Heroku the action to carry out after the deployment has been successful; this is the Procfile file, which you need to create under the parent folder, at the same level as the parent pom.xml.
The content of your Procfile is shown in the next snippet:
Notice that this will call the webapp-runner.jar file in order to launch your WAR file in Heroku, so you need to add a new plugin to your parent pom.xml, as shown in the next snippet:
This will include the webapp-runner.jar into your compilation.
Apart from the creation of the Procfile and the inclusion of the new plugin to your pom.xml you need to include the changes mentioned above regarding your applicationContext.xml to define your dataSource in the right way.
Commit the code to the Heroku repository
In Eclipse, right-click on your Heroku project and then Team > Commit.
When committing the files, you need to make sure that all the target folders are ignored, so your locally compiled files are not uploaded to the Cloud.
Type your comments about this commitment and click on Commit.
Push the code to the Upstream
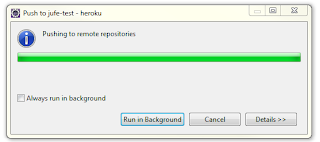 After committing your code you can push it to the Upstream for Heroku to perform the Maven packaging.
In Eclipse, right-click on your Heroku project and then Team > Push To Upstream.
At the end of the process you will be shown a breakdown of the actions carried out with the successful or erroneous result. This way you make sure that your application compiles in Heroku and your application is ready to be deployed.
Package your app and deploy your WAR file
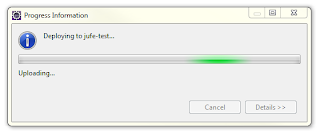 You can now package your application with Maven as you usually do (mvn package) in order to generate your WAR file that will later be deployed.
Once your application has been packaged and your WAR file is available, you can deploy it to Heroku; you can use the Heroku plugin in Eclipse to do this. From your "My Heroku Applications" view in Eclipse, right-click on your app, select the Deploy... option and choose your WAR file to deploy.
After the deployment of your WAR file has finished and been successful, you need to make sure that the DATABASE_URL variable is in the list of Environment Variables for your app. This is important, because this variable is required to create the dataSource bean, and if it has not been created during the deployment, the application will fail to start.
Scale your app
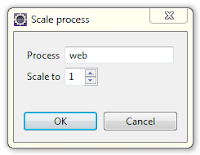
After deploying your WAR file, your application is ready to be started. You need to scale your web app in Heroku, which you can do through your "My Heroku Applications" view in Eclipse, right-click on your app, select the Scale option and fill in the next dialog as shown in the picture.
You can confirm that your app has been scaled by checking your Heroku Dev Center and clicking on the resources of your application, which will now show the Dynos increased by one.
Your app will now be up and running on Heroku and you should be able to access it through the URL provided.
Additional considerations regarding URLs
In the process of loading my apps to Heroku, I experienced some issues with the URLs and the redirections of the pages; go to the next post on my blog to read more: Managing Web App's URLs in Heroku.
I hope this post was helpful. Any doubts or problems you find, please leave a comment to let me know. Any feedback is welcome.


Hi, I have created a simple application on heroku - java. I need to clone the code to github, Please give the steps to do this.
ReplyDelete