Thursday 25 October 2012

Aplicación Java Spring MVC Heroku (Español) - Instalar archivo WAR en Heroku

This information in English:
Heroku es una plataforma que permite alojar tus aplicaciones en la Nube (Cloud) de manera fácil y rápida. Heroku pertenece al proveedor de Cloud Computing Salesforce, y es una herramienta que permite migrar tus aplicaciones a la Nube, ya sean aplicaciones Java, Python, Ruby, Clojure o Scala, sin necesidad de efectuar ninguna configuración en servidores, ya que toda la parte de servidor es automáticamente gestionada por Heroku.

La documentación online que proporciona Heroku puede ser de ayuda al principio, sobre todo para configurar tu entorno de desarrollo, para entender el funcionamiento de la plataforma y empezar a subir rápido las aplicaciones de ejemplo. El problema es que la documentación de Heroku y todo el entorno de trabajo que Heroku proporciona está disponible únicamente en inglés.

El primer artículo donde se explica los requisitos necesarios para empezar a manejar tus aplicaciones Java con Heroku es "Getting Started with Java on Heroku"; que básicamente dice que  lo necesario para empezar es lo siguiente:
  • Conocimiento básico en Java y una versión instalada de JVM y Maven
  • Tus aplicaciones deben ser compatibles con OpenJDK, versiones 6 o 7
  • Una cuenta de usuario de Heroku: puedes crear una cuenta gratis de forma instantánea
La mayoría de la gente que programa en Java usa Eclipse, por lo que es recomendable instalar los plugins para Heroku y Git (requieren Eclipse versión 3.7 o superior); este enlace de Heroku explica los pasos necesarios para instalar el plugin de Heroku y este artículo del projecto EGit para el plugin de Git.

Si tienes tu propia aplicación Web y usas Spring MVC, lo que probablemente te interesará será la manera más fácil y rápida de subir tu aplicación a la Nube. Los artículos que proporciona Heroku para aplicaciones Spring MVC explican los pasos necesarios para clonar las aplicaciones de ejemplo de sus repositorios, pero si quieres subir una aplicación propia que ya tengas desarrollada en Java/Spring, la documentación oficial no da muchos detalles y no es muy clara en ese sentido. Por eso he escrito este artículo, para explicar paso a paso y en un mismo sitio lo que hay que hacer para instalar tus archivos WAR en Heroku, incluyendo los cambios necesarios en cuanto a la conexión con la base de datos, los plugins en el fichero pom.xml o la nomenclatura necesaria para las URLs.
Crea una aplicación Heroku vacía

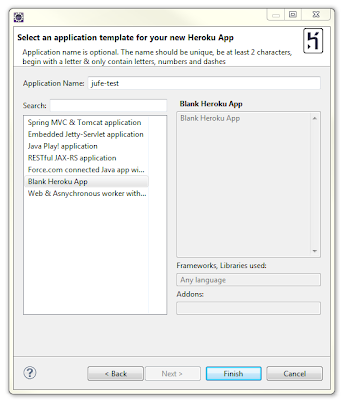
Para crear una aplicación vacía en Heroku desde Eclipse, efectúa los siquientes pasos:

New > Project > Heroku > Create Heroku App from Template.

Rellena el campo Application Name con el nombre que le quieres dar a tu aplicación (tiene que ser un identificador único dentro de Heroku), selecciona la opción Blank Heroku App y haz click en Finish para crear una nueva aplicación de Heroku sin nada.

Al finalizar estos pasos se generará un nuevo proyecto en tu espacio de trabajo local, que será accesible con el explorador de directorios o desde Eclipse en tu explorador de paquetes.

Si accedes a tu centro de desarrollo de Heroku también podrás ver la aplicación que acabas de crear; aparecerá algo similar a lo que se muestra en la imagen siguiente:


Esta nueva aplicación ha sido creada completamente vacía en el entorno de Heroku, sin ningún tipo de recursos disponibles, de manera que hay que crear una base de datos y añadir el código Java de la aplicación que quieres subir a la Nube.

Crear una base de datos Postgresql en Heroku
Recursos de la Aplicación (vacío)

Las bases de datos que usa Heroku en sus ejemplos son siempre Postgresql (aunque se pueden utilizar otras), de manera que en este ejemplo también usaremos Postgresql para alojar la información de nuestra aplicación. Crear tu propia base de datos Postgresql es muy fácil desde tu cuenta del Centro de Desarrollo de Heroku. Haciendo click en el icono Resources se muestran los recursos de que dispone tu aplicación.


Al hacer click en el enlace Get Add-ons accederás a la página de Addons de Heroku, donde encontrarás el addon para Heroku Postgre y lo puedes instalar en tu aplicación; una vez instalado aparecerá como recurso disponible en tu lista de Addons.

El Addon de Heroku Postgres Dev está instalado en la aplicación
Conexión con la base de datos Postgresql

El nuevo Addon que se ha añadido a los recursos de tu aplicación es una base de datos Postgresql, que se encuentra vacía y, por tanto, hace falta crear la estructura de datos que necesites para ejecutar tu aplicación.

Conexión desde un cliente de base de datos: Los datos de conexión de la base de datos Postgresql que has creado en Heroku se pueden obtener accediendo al siguiente enlace para la configuración de la base de datos Heroku Postgre. Haciendo click en tu base de datos desde el Centro de Desarrollo de Herodu accedes a dicho enlace. Te puedes registrar gratis y, una vez que accedas, verás una lista con todas las bases de datos que tengas disponibles en Heroku, y para cada una de ellas puedes ver los parámetros de conexión haciendo click en el nombre de la base de datos.
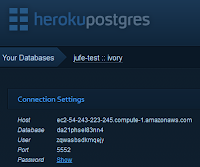
 
Para conectarte de forma remota a tu base de datos Postgresql, necesitarás usar dos parámetros adicionales, ya que Heroku añade un grado de seguridad ssl a la conexión, esos parámetros y sus valores deben ser los siguientes:
  • ssl=true
  • sslfactory=org.postgresql.ssl.NonValidatingFactory
Una vez que te hayas conectado a través de tu cliente de base de datos, puedes empezar a construir tu estructura de datos, crea tus propias tablas e inserta tus filas de datos.

Conectar tu aplicación local a la base de datos de Heroku: Es recomendable probar la conectividad desde tu aplicación Spring MVC; para ello, deberás configurar tu dataSource de la siguiente manera:

Recuerda añadir el parámetro connectionProperties, si no lo añades a tu configuración, la conexión a la base de datos será rechazada.

Conectar tu aplicación Heroku a la base de datos de Heroku: En este caso, la configuración para la conexión se obtendrá directamente de una variable creada en el contexto de tu aplicación Heroku; deberás crear dos beans en tu configuración de Spring para especificar el parámetro dataSource, como muestra el siguiente ejemplo:

La variable DATABASE_URL se genera por defecto en el contexto de Heroku; cuando se instala el archivo WAR (deploy), se añade esta variable automáticamente al contexto de tu aplicación; el plugin de Eclipse para Heroku te permite ver las variables de entorno de que disponen tus aplicaciones. Si abres la vista de Eclipse "My Heroku Applications" y haces click con el botón derecho en el nombre de tu aplicación puedes seleccionar la opción App Info, y accediendo a la pestaña Environment Variables podrás encontrar esta información:


Llegados a este punto, ya se ha configurado todo lo necesario para ejecutar tu aplicación en la Nube a través de Heroku; sin embargo, es muy probable que las variables de entorno DATABASE_URL y JAVA_OPTS no se encuentren todavía en la lista de variables, ya que se generarán cuando se instale la aplicación (deploy).

Antes de subir tu código fuente a la Nube, es preciso realizar algunos cambios, que se explican a continuación en este artículo.

Cambios en tu código

Puedes copiar el código perteneciente a tu aplicación local en el directorio donde se ha creado tu nueva aplicación.
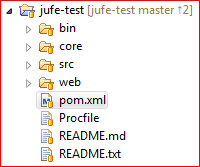
 
Cuando subas e instales tu aplicación a la Nube, Heroku buscará un archivo específico para ejecutar tu aplicación, de modo que es necesario crear dicho fichero para indicar a Heroku qué acción debe realizar una vez que la instalación de la aplicación se ha efectuado correctamente; este fichero es el Procfile, que debe ser creado bajo el directorio raíz del proyecto de tu espacio de trabajo, al mismo nivel que el archivo pom.xml padre.

El contenido del Procfile debe ser el siguiente:
 
Esta instrucción llamará al fichero webapp-runner.jar para instalar tu archivo WAR en Heroku, así que hace falta incluir un nuevo plugin en tu pom.xml padre, como se muestra a continuación:

De esta manera se incluirá el archivo webapp-runner.jar a tu aplicación cuando la compiles.

A parte de crear el Procfile y de incluir el nuevo plugin en tu pom.xml, deberás incluir los cambios indicados al principio de este artículo en cuanto al fichero de configuración de Spring, applicationContext.xml, para definir el dataSource de forma adecuada.

Añadir el código al repositorio de Heroku

Para ello usaremos el plugin de Git desde Eclipse, haciendo click derecho sobre tu proyecto Heroku y después Team > Commit.
Cuando añadas tu código, debes asegurarte de que los directorios target estén marcados para que se ignoren, de manera que tus compilaciones locales no lleguen a la Nube.
Introduce tus comentarios antes de añadir los ficheros y haz click en Commit.

Subir el código a Heroku
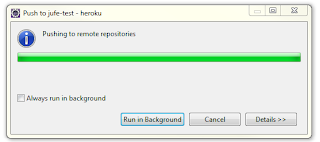
AUna vez añadido el código al repositorio, se puede subir a Heroku para que Heroku genere el la compilación mediante Maven.
Desde Eclipse, haz click derecho en tu proyecto Heroku y luego Team > Push To Upstream.
Al final del proceso, se mostrará un informe con las operaciones que se han llevado a cabo y el resultado final de cada una, ya sea correcto o erróneo. De esta manera te aseguras de que tu aplicación compila perfectamente en Heroku y que tu aplicación está lista para ser instalada.

Compila tu aplicación e instala tu archivo WAR
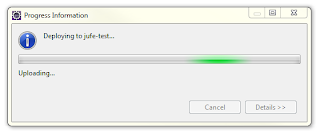
Ahora puedes compilar tu aplicación como lo haces normalmente con tus aplicaciones locales (mvn package) para crear tu archivo WAR, que posteriormente se instalará en la Nube.
Para instalar en Heroku el WAR que acabas de compilar correctamente, puedes usar el plugin de Heroku en Eclipse; en la vista de Eclipse "My Heroku Applications", haz click derecho sobre tu aplicación, selecciona la opción Deploy... y finalmente elige el archivo WAR que acabas de compilar.

Una vez que tu archivo WAR se ha instalado correctamente, tienes que asegurarte de que la variable DATABASE_URL se encuentra en la lista de tus variables de entorno de tu aplicación. Esto es muy importante, porque esta variable es necesaria para crear el bean dataSource, y si no ha sido creada al instalar el WAR, la aplicación no se podrá ejecutar.

Escalar tu aplicación
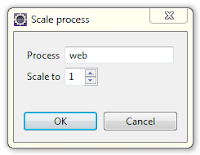
Después de instalar tu WAR, ya tienes tu aplicación lista para arrancar. Hay que escalar la aplicación web en Heroku, que se puede hacer de nuevo desde la vista de Eclipse "My Heroku Applications", haciendo click derecho sobre tu aplicación, selecciona al opción Scale y rellena los campos del cuadro de diálogo como se muestra en esta imagen.

Para confirmar que tu aplicación se ha escalado correctamente puedes abrir tu Centro de Desarrollo de Heroku y acceder a los recursos de tu aplicación, donde verás ahora que tus Dynos tienen un valor de 1.


Tu aplicación ya está lista en Heroku y ya deberías poder acceder a ella mediante la URL que te ha proporcionado Heroku.

 
Consideraciones adicionales sobre las URLs

Cuando he subido mis aplicaciones a Heroku, me he dado cuenta de que hay algunos aspectos relacionados con las URLs y que algunas páginas no eran redireccionadas de la forma en que yo esparaba; visita esta otra entrada de mi blog para más detalles: Managing Web App's URLs in Heroku.

Espero que este artículo te haya sido de ayuda. Si tienes alguna duda o algún problema siguiendo los pasos explicados, por favor, deja tu comentario.


Monday 8 October 2012

JSON in Spring as @RequestBody of a Form Controller

This post explains how to render JSON objects in the Spring MVC in a form controller class while being able to pass other types of objects within the same application.

In Spring 3.x the AnnotationMethodHandlerAdapter class is extended to support the @RequestBody parameter and has the following HttpMessageConverters registered by default:
  • ByteArrayHttpMessageConverter converts byte arrays
  • StringHttpMessageConverter converts strings
  • FormHttpMessageConverter converts form data to/from a MultiValueMap<String, String>
  • SourceHttpMessageConverter converts to/from a javax.xml.transform.Source
  • MarshallingHttpMessageConverter converts to/from an object using the org.springframework.oxm package
In order to support JavaScript Object Notation (JSON objectcs), you will need to create an AnnotationMethodHandlerAdapter bean in your Spring configuration with a MappingJacksonHttpMessageConverter and annotate your Controller service method with the @RequestBody annotation.

The following snippet shows the Spring configuration required to iterate over the message converters sequentially until it finds one that matches the object you are returning, so it can render JSON objects from the form controller receiving the data:

The method shown in the next Java snippet receives a ContactUpdateList object, which is not a standard Java object; Spring will iterate through the message converters in the AnnotationMethodHandlerAdapter list for a suitable message converter and because the ContactUpdateList class is not handled by any of the other converters, it will eventually get to the MappingJacksonHttpMessageConverter, hence the object will be handled as a JSON.


This post could perfectly finish at this point if you were only interested in processing JSON objects of the same type, but if that is not the case and your Spring application needs to use other types of converters keep reading.

By default the Spring MVC defines three different request handler adapters, they are:
  • org.springframework.web.servlet.mvc.HttpRequestHandlerAdapter
  • org.springframework.web.servlet.mvc.SimpleControllerHandlerAdapter
  • org.springframework.web.servlet.mvc.annotation.AnnotationMethodHandlerAdapter
So you do not need to define them in your context file. However, if you define at least one handler adapter in your context files, Spring will ignore the default adapters and will not create them.

Since we are creating the AnnotationMethodHandlerAdapter in our example context definition above, Spring will not create the other two handler adapters.


In case you need to use other types of adapters, you will have to specifically create the beans for those adapters, as shown next:


Wednesday 3 October 2012

Managing Web App's URLs in Heroku

On my previous post there is a step by step explanation on how to create your own Web App in Heroku.

After I finished the whole process and I had my Web App up and running on Heroku, I thought I had reached the end and it would all be working smoothly. My surprise came when some pictures on my site and some pages redirections were not working properly.

The key is in the way that you specify your URLs; you cannot use the forward slash ('/') to prefix your URLs, because Heroku will understand them as absolute paths, and it will look for the page in the wrong place.

That was the case of my web app, the login page had a reference to a warning image, but this image was not being loaded when the error message appeared.

The next snippet shows the original source code for that image import.

The problem was that I was using the forward slash ('/') as a prefix for the image's URL, so the change required to get this working is to just remove this prefix, so that Heroku understands it as a relative path, as shown in the following snippet.

The same thing happened with some script imports I was doing to be used with my pages, and it was solved in the same way, just by removing the preceding forward slash ('/') from the URLs.

However, another problem arose when redirecting to the login failure URL (that was being handled by Spring Security), whose solution is similar to the one stated above, but requires more customisation.

Spring Security URL Authentication Failure Handling

The default URL authentication failure handler used within Spring Security is the SimpleUrlAuthenticationFailureHandler; the next snippet shows the typical definition of the security beans to use the default handler:

The default class does not accept a URL without a forward slash ('/') prefix, so that makes it impossible to specify the redirection as stated above in this post.
Apart from that, the redirection uses a RedirectStrategy object, which modifies the URL string specified in the bean.

The solution I propose to solve this issue is to create a custom class to handle the authentication failure, and then use that class as a reference for the form-login bean.

The new definition of the security bean is as follows:

And the code for the new class NoSlashAuthenticationFailureHandler is shown in the next snippet; as you can see, the redirection is not using any RedirectStrategy object, so it will not modify the value of the URL that you specify in the constructor bean.

So there you are the way to keep using Spring Security to handle the authentication failure. Try it on your Web App and let me know any feedback in the comments section.
 

Custom Spring MVC Web App in Heroku - Deploy WAR File on Heroku

Esta información en Español:
The Heroku platform is one of the easiest and quickest ways of getting your apps up and running in the Cloud. Owned by Salesforce, it provides you with all the tools you need to move your Java, Python, Ruby, Node.js, Clojure, or Scala applications to the Cloud, forgetting about all the server side maintenance; all this will be handled by Heroku.

The Heroku online documentation is very helpful to get you started, as there are a few articles to help you set up your environment. The first one you should read to check the prerequisites is the Getting Started with Java on Heroku post; but basically, what you need to bear in mind is the following:
  • Basic Java knowledge, an installed version of the JVM and Maven
  • Your application must run on the OpenJDK version 6, or 7
  • A Heroku user account: signup is free and instant
Most of Java developers use Eclipse, so it is a good practice to install the Heroku and the Git plugins for Eclipse (Eclipse 3.7 or higher required); have a look at this Heroku article to find instructions on how to install the Heroku plugin and this EGit Project article for the Git plugin.

If you have your own Spring MVC Web application, then you are probably looking for the quickest way to get it up in the Cloud. The Heroku articles on Spring MVC apps give you instructions to clone sample applications from their repositories, but it is not easy to find details on how to deploy your own custom Spring MVC app. That is why I am writing this post, to gather all the steps required to deploy your WAR files to Heroku, including the changes you need to perform in terms of database connection, the plugins in you pom.xml file or URL nomenclature.

Create your empty Heroku app

Perform the following steps in Eclipse to create a blank Heroku application:

New > Project > Heroku > Create Heroku App from Template.

Fill in the Application Name field with the name you want for your application (it has to be a unique identifier within Heroku), select the Blank Heroku App option and click on Finish in order to create an empty Heroku application.

This action will automatically generate your new project in your Package Explorer and in your local folder structure.


The newly created app will also be available in your Heroku Dev Center, which will look like shown next:


This is just an empty application that has been created in the Heroku space, without any resources available; you now need to create your database and load your code.

Create your Postgresql Database in Heroku
Application's resources (empty)

Heroku sample apps provide Postgresql databases, so this sample application will also implement a Postgresql database to hold the data to be used. You can create your Postgresql instance from your account in the Heroku Dev Center. By selecting the Resources icon, you will be shown your app's resources.


By clicking on the Get Add-ons link you will be redirected to the Heroku Addons page, where you can select the Heroku Postgre addon and install it on your app.

Heroku Postgres Dev Addon installed on the app
Connecting to your Postgresql database

Your new Postgresql database addon has been added to you app, and it is an empty database so you need to create your data structure.

Connecting from a database client: The connection information for your Postgresql database can be obtained from the Heroku Postgre site. Clicking on your database from the Heroku Dev Center takes you to the Heroku Postgre site, where you can login for free and you will be shown the list of all your Heroku databases, and for each of them you can view the connection details.
 
When attempting to connect remotely to your Postgresql database, you need to use two additional parameters for the connection:
  • ssl=true
  • sslfactory=org.postgresql.ssl.NonValidatingFactory
Once you are connected through your DB client, you can prepare your data (create tables and insert rows).

Connecting your local app to the Heroku database: It is a good practice to test connectivity from your Spring MVC application. You will have to configure your dataSource as shown next:

Do not forget about the connectionProperties parameter, without which your connection will be refused.

Connecting your Heroku app to the Heroku database: The configuration in this case should be taken from the environment variable created in your Heroku app for the database configuration. You need to create two beans to specify your dataSource, as shown next:

The environment variable that Heroku creates by default is DATABASE_URL, which will be automatically added to the application's context when you deploy the WAR file; you can view your environment variables from your Heroku plugin for Eclipse. If you go to the "My Heroku Applications" view within Eclipse and you right-click on your app, you can select the App Info option, and then in the Environment Variables tab you will find the information:


At this point you have performed all the required set up to take your app to the Cloud using Heroku; however, it may be that the DATABASE_URL and JAVA_OPTS environment variables are not in your list yet, as they are generated on deployment.

You now need to perform some changes to your code before uploading it to the Cloud.

Changes to your App's code

You can copy your code from your local workspace to the folder where your new application has been created.
 
When you deploy your app to the Cloud, Heroku will look for a specific file, so you need to create this file to tell Heroku the action to carry out after the deployment has been successful; this is the Procfile file, which you need to create under the parent folder, at the same level as the parent pom.xml.

The content of your Procfile is shown in the next snippet:
 
Notice that this will call the webapp-runner.jar file in order to launch your WAR file in Heroku, so you need to add a new plugin to your parent pom.xml, as shown in the next snippet:

This will include the webapp-runner.jar into your compilation.

Apart from the creation of the Procfile and the inclusion of the new plugin to your pom.xml you need to include the changes mentioned above regarding your applicationContext.xml to define your dataSource in the right way.

Commit the code to the Heroku repository

In Eclipse, right-click on your Heroku project and then Team > Commit
When committing the files, you need to make sure that all the target folders are ignored, so your locally compiled files are not uploaded to the Cloud.
Type your comments about this commitment and click on Commit.

Push the code to the Upstream

After committing your code you can push it to the Upstream for Heroku to perform the Maven packaging.
In Eclipse, right-click on your Heroku project and then Team > Push To Upstream.
At the end of the process you will be shown a breakdown of the actions carried out with the successful or erroneous result. This way you make sure that your application compiles in Heroku and your application is ready to be deployed.

Package your app and deploy your WAR file

You can now package your application with Maven as you usually do (mvn package) in order to generate your WAR file that will later be deployed.
Once your application has been packaged and your WAR file is available, you can deploy it to Heroku; you can use the Heroku plugin in Eclipse to do this. From your "My Heroku Applications" view in Eclipse, right-click on your app, select the Deploy... option and choose your WAR file to deploy.

After the deployment of your WAR file has finished and been successful, you need to make sure that the DATABASE_URL variable is in the list of Environment Variables for your app. This is important, because this variable is required to create the dataSource bean, and if it has not been created during the deployment, the application will fail to start.

Scale your app

After deploying your WAR file, your application is ready to be started. You need to scale your web app in Heroku, which you can do through your "My Heroku Applications" view in Eclipse, right-click on your app, select the Scale option and fill in the next dialog as shown in the picture.

You can confirm that your app has been scaled by checking your Heroku Dev Center and clicking on the resources of your application, which will now show the Dynos increased by one.


Your app will now be up and running on Heroku and you should be able to access it through the URL provided.
 
Additional considerations regarding URLs

In the process of loading my apps to Heroku, I experienced some issues with the URLs and the redirections of the pages; go to the next post on my blog to read more: Managing Web App's URLs in Heroku.

I hope this post was helpful. Any doubts or problems you find, please leave a comment to let me know. Any feedback is welcome.